
Introduction
The purpose of this document is to provide clear guidelines to use ROGO platform Administrators. What is important to note is that the platform is fully compatible with Electronic Invoice System – SEF. Every electronic invoice that arrives on the SEF platform is automatically uploaded to ROGO. In this environment you will manage more easily the invoices, add some approval route, track the process, prepare them for posting.
Roles
All users of the application can be divided into 2 groups
- 1) Administrators
- 2) Approvers
General functionality of each role:
- 1) Administrator - represents a role with the following functions:
- a) Creates orders for approvers
- b) Creates templates for approval
- c) Manages supplier data
- d) Manages newly arrived invoices (assigns them for approval, follow the approval process
- 2) Approver – represents a role which is created by Administrator. Their task in the approval circle is approve or not approve invoices and as necessary to enter additional information for each of the invoices they process.
Home page
All administrators which are registered for use the ROGO platform, on the e-mail they use for access, will receive an e-mail with a link to set a password. After setting a password they can access the Rogo platform via website (https://app.rogo.rs/). We can see the layout of the Login page in the image below:
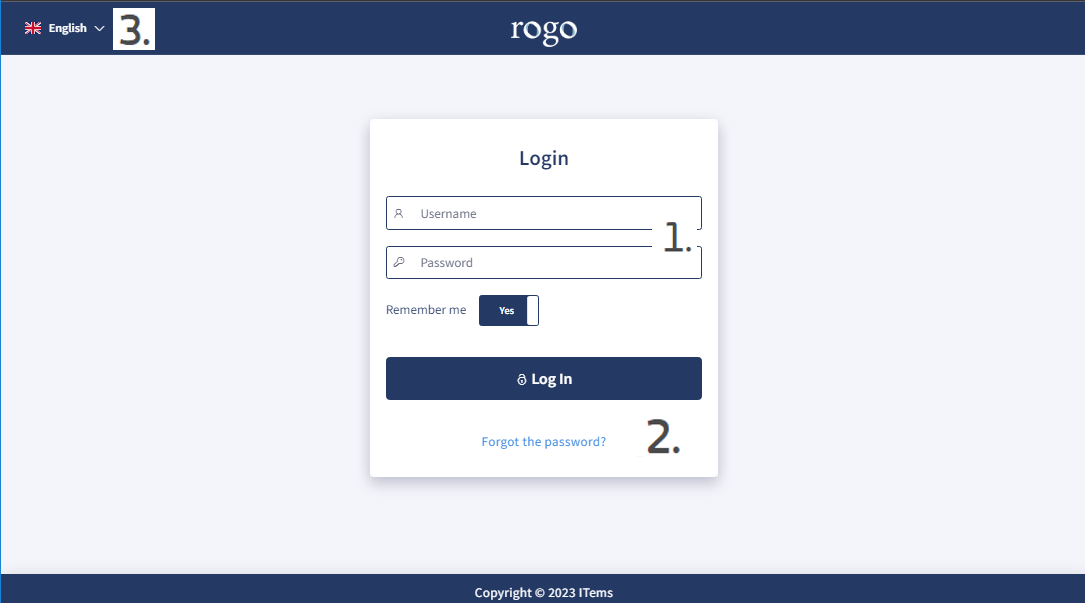
Login page elements:
1. Login fields – To log in to the Rogo platform, you will use the e-mail address you registered with and the password you set when you used the platform for the first time
2. In case you forget your password, you can use the option to reset your password (Forgot your password?). In that case, you will receive a message containing a link to set a new password to the email you registered with
3. Link to change platform language. The platform is available in two languages: Serbian and English
Main menu items
After successfully login to the platform, the administrator on page header can find main menu with the next options:

Since each of the options is very important, we represent a detailed explanation of each one:
 Approvers
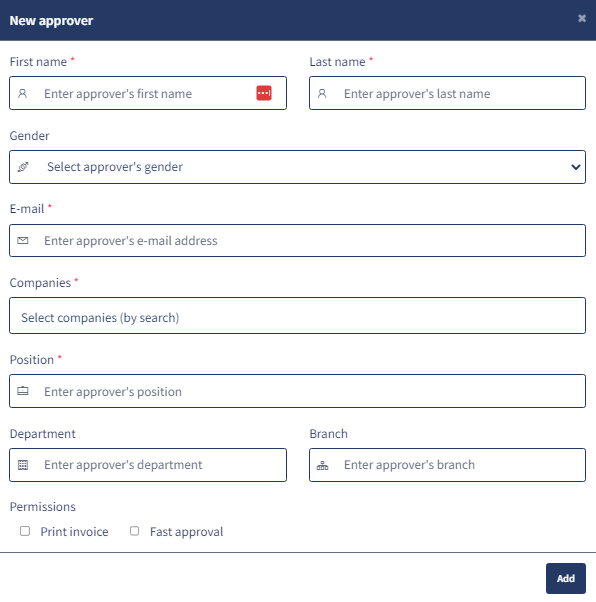
Approvers isn’t the first item in the menu of company Administrator, but is definitely an item to start with. To insert a new approver, you need to click on  and then fill out the offered form. It is necessary to have e-mail address, name, surname and a position in the company for each new approver. E-mail address must be unique. In other words, if you try to insert an approver using an email address that is already in use as an admin, you will not succeed. Immediately after creating a new approver, he will receive a link to set a password, and then he will be able to access to the ROGO platform.
Additionally, the following options are available to you: 
- - Recycle bin is for delete Approver. It is possible to delete only those approvers who didn’t participate in the approval process.
- - With pen you can update data/information about approver
- - Manages supplier data
- - The option transfer of approvals serves to all invoices that are pending with one approver, who is temporarily unavailable (vacation, sick leave or similar), switch to another approver.
To watch a video instruction “Add an approver“ click on link Bookkeepers
A role of the bookkeeper is specific – when the accounting clerk login to the ROGO platform, they see all invoices at the company level and can change the invoice status from approved to processed if it is necessary. Creating a new bookkeeper is similar as creating an approver, it is necessary to click on  and then fill out the offered form. Immediately after creating a new bookkeeper, he will receive a link to set a password, and then he can access to the ROGO platform.
Template for approvals
For invoices that are registered on ROGO platform you need to create a chain of approval (approval). Because it is a work that needs be done for every invoice, it is clear that the best practice is to create a template. For create a new template it is necessary to click on
For create a new template it is necessary to click on  . Then on the screen will appear a form you have to fill out.
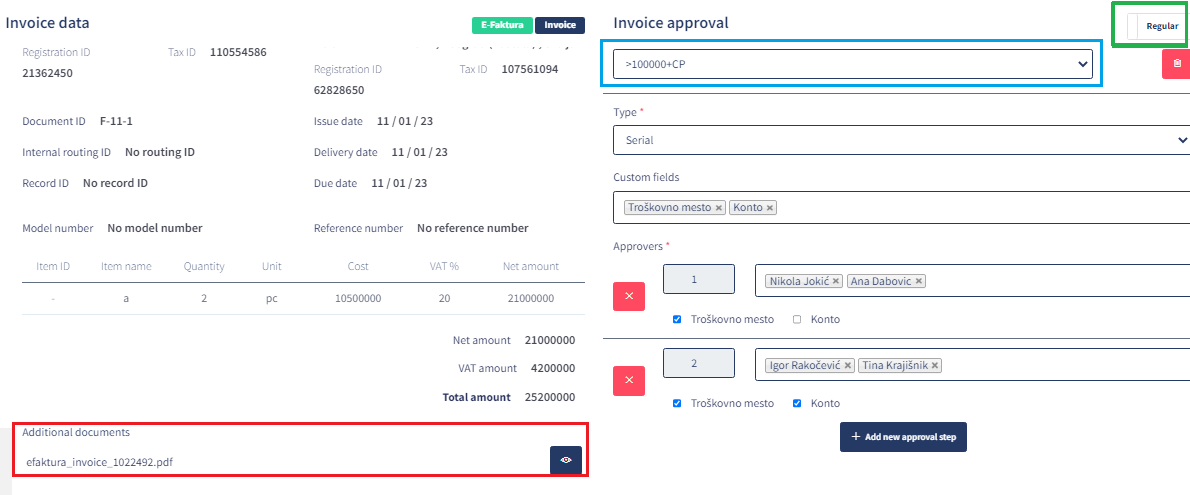
For each template, you need to choose the name of the template, then what type of approval (serial or parallel). With serial, when we have several rounds of approval, it is necessary to give approval to each step-in order to move on to the next one in the chain. With parallel approval the order of approval is not important.
The next option is approval conditions. It is possible to set more conditions. In our example two conditions are set over the same field “Total amount“ which invoice must fulfill to make the template applicable (Total amount of invoice is greater than 200.000 and less than 1.000.000). If you don’t insert any conditions, then the template is applicable to every newly arrived invoice.
The option custom fields allow you, beside approving invoices, to fill additional fields to the approvers. In our example is Cost centers (it is fill out at the first step) and field Account (it is fill out at the second step). It is important to note that these fields are not predefined and can be created on demand.
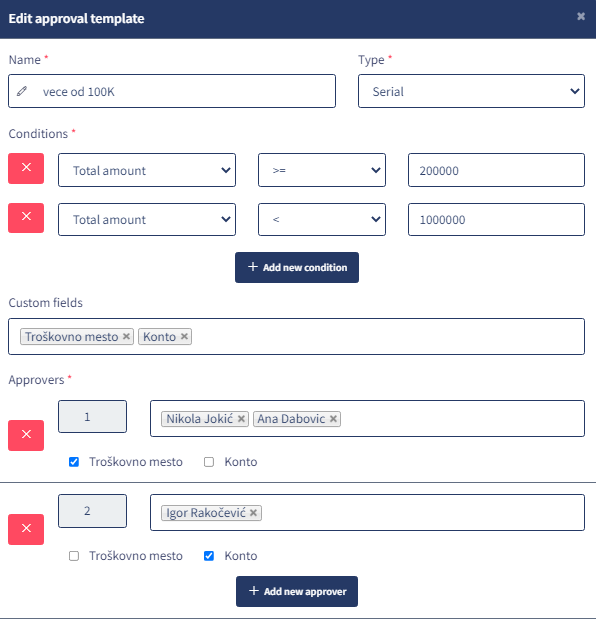
At finally the part about approvers. Using the field for + add a new approval, it is possible to add as many circles as you need. You can add one or more approvers in each round. It is necessary that one of the approvers give consent for invoice. In our example in the first round Nikola or Ana gives consent, and in the second round Igor.
To wach a video instruction “Creating an approval template“ click on link Incoming invoices
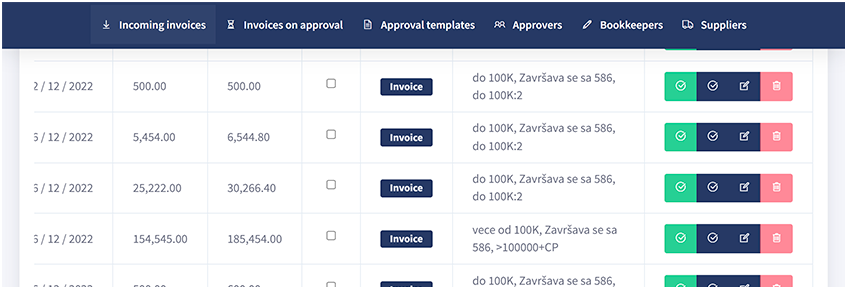
All invoices that are waiting to be sent to the approval process are located on this page. The page has this element:
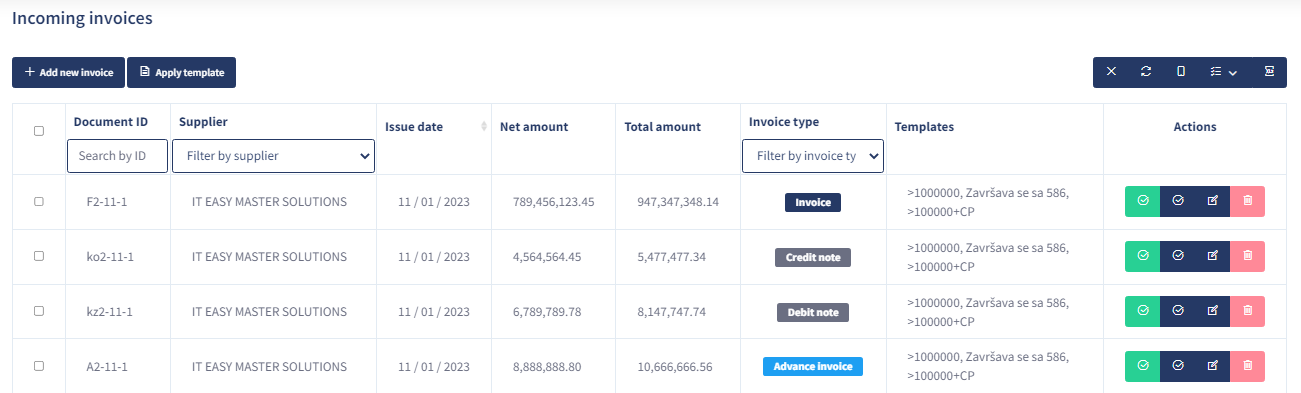
1. Add a new invoice – In addition to invoices that will be displayed here, which will be automatically downloaded from SEF (in the Origin column they have a label  ), you have the option to manually add an invoice that arrived from another (for example international invoice). Manually added invoices have label in the Origin
2. The following tools are available for managing Incoming invoices:
 - Remove invoice. This option isn’t available for e-invoices.
 - Change invoice. With E-invoices, this option allows you to upload an additional pdf. documentation, while the other fields are locked. With Rogo invoices (manually created) with this option you can change all fields before submitting to the approval process.
 - Add a new approval. When we want to submit the invoice for approval, we use this option. A form opens where we can use an already created template if it is applicable or create a new one-time template on the spot:
3. The option Apply the template serves to apply a predefined template to multiple invoices at once. It is enough to select invoices that have an applicable common template, then click the button and select a template that is applicable to all selected invoices. If such a template does not exist, the list of applicable templates will be empty. In this process column Templates can help you, in which you have a list of all applicable templates for each individual invoice.
 Invoices on approval
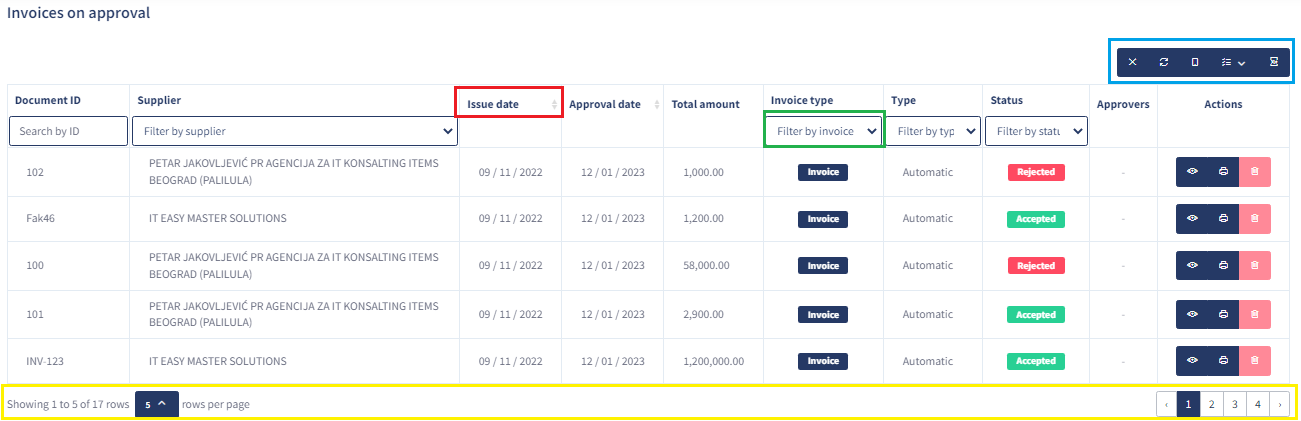
When we sent an invoice on approval, this is the page where we can follow the process.
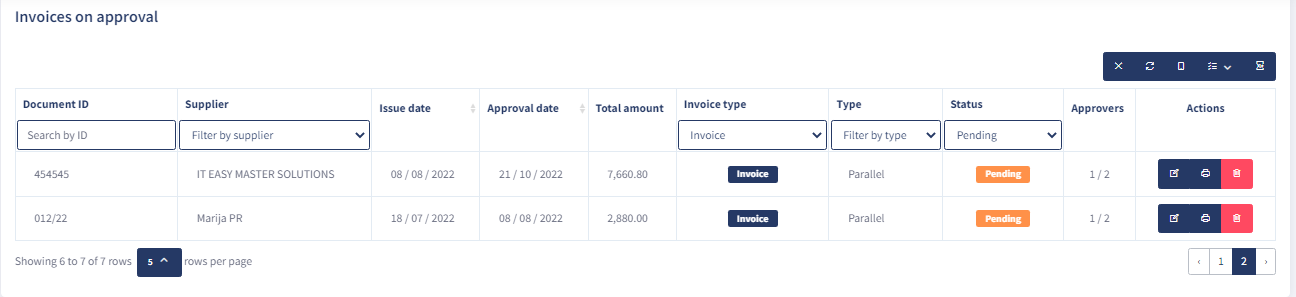
It is important to note that every administrator, except for invoices for which he has assigned template for approval can see also invoices released by others for approval. The difference is that he cannot change or delete approvals for those invoices. Also, in the column Status invoices are pre-filtered to show only those currently under approval –  . If you want to see invoices that have been previously approved or rejected, you need to change the filter. In the column Approvers, the first number shows how many users have approved a specific invoice so far, and the second number shows how many rounds of approval there are in total (for example 2/3). In the column Actions you can change the template, but only for approvers who are not yet in a line for approval.
 Suppliers
The page Supplier automatically create a supplier base, based on the sender of invoices through the SEF system. If necessary, you can manually add Supplier (for locally created invoices) or change or delete existing Suppliers.
Addition 1 – Instructions for Approvers
While the administrator has more pages and options to manage, the Approvers situation is much simpler. The Approver, when he logs in with his e-mail and password, access to the page where are located all the invoices assigned to him for approval:

In the column Status the invoices are pre-filtered to show only those that are currently under approval  . If you want to see invoices that you have previously approved or rejected, it is necessary to change the filter.
When you want to work on some invoice it is enough to click on action the approve invoice -
. If you want to see invoices that you have previously approved or rejected, it is necessary to change the filter.
When you want to work on some invoice it is enough to click on action the approve invoice -  .
.
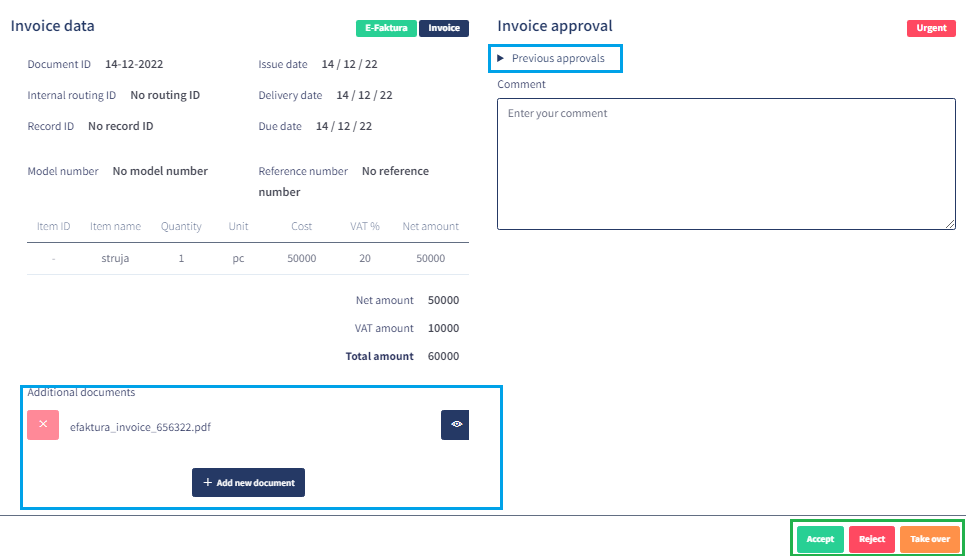
When the dialog window opens as in the picture, the following options are available to you. You can see an invoice or added documentation, or add more pdf documents related to this invoice (in the picture blue frame). If the invoice is approved in several steps, you can view previous approvals (in the picture red frame). For each invoice you have three options: to accept it, to reject it (in that case comment is necessary) or Take over for work (in the picture green frame). When you Take over the invoice gets a status Taken over, in this way you inform the administrator and other approvers in the same circle of approval about that.
There is also a system for notifying the Approver about invoices that have arrived for approval. Every morning at 9 am the approver will receive an e-mail informing him if one or more invoices have arrived for approval in the last 24 hours, which have not been approved in the meantime.
Addition 2 – Working with tables
In the ROGO platform data is in most cases in tables. That`s why we paid special attention to tools that allow easier manipulation of table data. Each table has the following elements:
In the upper right corner of each table (in the picture blue frame) contains tools for working with the table:
 Option to delete the search field (filters)
 Option to refresh data in the table
 Option to change table view to mobile friendly. Especially suitable for approvers.
 Option to add or remove columns in the table.
 The option allows downloading data from the table to Excel. It is important to note that only the data that can be seen in the table is downloaded to Excel. If you filter the data for a specific company and then download to Excel, you will only have those invoices related to that company.
If you refresh the page, all the data in the table will return to the initial view!